Menu

Show posts

This section allows you to view all posts made by this member. Note that you can only see posts made in areas you currently have access to.

Show posts Menu

Topics - David Johns

#41
A few things can cause you to to receive the error message "Quickbooks runtime is not properly installed, would you like to download the installer at this time?"  Try the following fixes in the order list.

1. Make sure that the runtimes are installed

There are two runtimes from Intuit, the makers of QuickBooks, that need to be installed.  SuperManager tries to help you automatically download and install both of these, but check that both are installed by downloading and manually installing them.  They can be downloaded from the following two links:

SuperManager versions 1.6.2.0 and greater
http://www.thesupermanager.com/download/redistributables/QBFC12_0Installer.exe

http://www.thesupermanager.com/download/redistributables/QBXMLRP2Installer.exe

SuperManager versions prior to 1.6.2.0
http://www.thesupermanager.com/download/redistributables/QBFC5_0Installer.exe

http://www.thesupermanager.com/download/redistributables/QBXMLRP2Installer.exe


2. If using SuperManager with Windows 7 or Windows Vista you will need to turn on the UAC (User Account Control Settings)

QuickBooks requires this to be turned on for third parties to access QuickBooks 2007 data.

a. Click Start->Control Panel
b. Open "User Accounts" sections until you reach the "Make changes to your user account" screen
c. Click the "Turn User Account Control on or off" link at the bottom of the list
d. Click the checkbox to "Turn on.." and then click "OK".
e.  You will need to restart your computer for the changes to take effect.


3. Make sure that SuperManager is not being run in Windows Vista/7 Compatibility mode

For a short time it was necessary to run SuperManager in compatability mode to allow it to interface with Internet Explorer.  Those issues have been resolved and in order to interface with QuickBooks compatability mode must be turned off.  To make sure this is the case:
a. Right click on the shortcut you use to open SuperManager and choose "Properties".
b. Select the "Compatability" tab.
c. Uncheck the option "Run this program in compatability mode for:".
d. Uncheck the option "Run this program as an administrator".
e. Press the "Change settings for all users" button.
f. Repeat steps c and d on this screen.
g. Press "Ok" to close each of the settings windows.


4. QuickBooks must be opened and logged in as administrator the first time you export

Because QuickBooks must ask the QuickBooks administrator for permission to allow SuperManager to access its data, it is necessary to have the QuickBooks window open and be logged in as administrator the first time you export to QuickBooks.  After the first time, QuickBooks will remember the permissions you  it and will be able to log in with QuickBooks closed as long as those permissions were granted to it.

5. Reset the integrated application access permissions

Rarely, the integrated application access permissions can get messed up from one release to another.  To fix this, go to "Edit", "Preferences" in QuickBooks.  Choose the "Integrated Applications" tab and select the "Company Preferences" tab.  Remove all entries of "The SuperManager" on this list.  Then, export from SuperManager again and you should get the access permission screen, which you will have to approve to re-grant access permissions.

If these don't fix the issue please email support at info@thesupermanager.
#42
If a computer crash, power outage or other major error occurs while SuperManager is writing the data file to the hard disk, the SuperManager file can be left in a corrupted state.  For this reason SuperManager saves a backup copy of your data file every time it successfully saves the file.  This backup file is located in the same folder as your database (.smg) file.  If your primary data file becomes corrupt you can restore it by opening this file in The SuperManager.  To do this follow these steps:
1. Locate the folder in which you store your SuperManager database (.smg) file.  If you do not know where it is, you may be able to find it by choosing "Start" | "Search" and searching "All Files and Folders" for files containing the "*.smg" in thier name.
2. In SuperManager select "File" | "Open..."
3. When the file selection window comes up change the drop down at the bottom of the window titled "Files of Type" to "SuperManager Backup (*.sbk).
4. In the file selection window navigate to the directory in which your SuperManager database (and its backup) reside and select the backup file.
5. Once the backup file opens and you asure that the data is there choose "File" | "Save" and it will ask you for a place to save the file.  Select the corrupt file so it is overwritten with the data from the backup file.

Note that by doing this you will loose any data that was added or altered from the previous successful save.
#43
FAQ / How Do I Send Reciepts via Email?
January 08, 2007, 04:13:46 AM
You can send any html receipt via email using the following steps:

1. Create an html template for the receipt or find the template you are using for printing receipts in SuperManager.  Note that a series of default templates is copied to C:\Program Files\SuperManager when The SuperManager is installed.  If you have always been using the default templates, they are likely found there.  SuperManager will tell you where the reciept templates are found when you go to "View" | "Store Settings..." then go to the "Reports" tab.  The location of each template is given next to the name.  The paths are stored relative to the location of the store database (smg) file you are viewing.  So in this example shown the templates would be up one directory from the directory where the smg file is located, then under the directory "SuperManager 1150" then the folder "Installer", then each html filename is given


2. Find the html file you just created or found in the windows explorer.  Right click on it and select "Open With..." | "Notepad" or use another text editor to view the html code of the file.


3. Once the file contents is displayed in Notepad you will need to find references to any images you include in your report template.  For example the default Sales Receipt has the line:
'<img border="0" src="logo.jpg"'  This should be changed to '<img border="0" src="www.yourwebsite.com\image_folder\logo.jpg"'.
Once this is done, press <ctrl>-A to select all the html code, then <ctrl>-C to copy it to the windows clipboard.


4. In The SuperManager go to "View" | "Store Settings..." and select the "Email Templates" tab.  Click the "New..." button and give the template a name.  Then fill in a subject for the email.  Then put the mouse cursor in the "Body" field and press <ctrl>-V to paste the html code into the body.  Lastly check the box that says "Send as HTML".  If you would like each receipt sent to you put the code "company_email" in the BCC field.  Once you have finished all these steps the email template should look something like this:


5. It is best to test the template by selecting a test order, right clicking on it and choosing "Send Email" Then select the name of the template you just created.  The SuperManager's email preview will not preview the html.  It will just show up as html code, however, when the email arrives in your inbox it should show the html properly.
#44
When upgrading to a new release The SuperManager should update your data and setting files without incident.  To  that your data is kept safe in the process we recommend the following proceedure.

1. Save a backup copy of your .smg file(s) to a safe folder on your harddrive, jump drive or on a CD/DVD-R.
2. Save a backup copy of your settings file, which by default is located at C:\Program Files\SuperManager\SuperManager.set.
3. In windows go to "Start" | "Control Panel" | "Add or Remove Programs" and look for "SuperManager" on the list.  Uninstall The SuperManager.
4. Run the installer provided by SuperWare.
#45
Unfortunately Yahoo exports do not allow the order status to be downloaded using the normal "Get New Orders" function in The SuperManager.  We have, however, created a method by which to import these order statii as they are selected in your Yahoo store manager.  This requires a two-step process.

1. Download your orders via the "Get New Orders" button, "Actions" | "Get Orders..." menu item or "Update from Yahoo!" function on the context menu on the order list (The menu that shows up when you right click on the order list).

2. Choose the orders for which you wish to get the status.  You can use ctrl-A to select all orders on the displayed list.  Then right click on one of the highlighted orders and choose "Get Order Status from Yahoo!".

This will set the order status in The SuperManager as it is in Yahoo!, import any tracking numbers, copy the repeat customer info and copy the merchant comments that are in the Yahoo! store manager.
#46
Yes!  The SuperManager can be used on multiple stores.  Each .smg file is capable of interfacing with a separate store.  You just need to keep a couple of things in mind when using The SuperManager with more than one store.

1. If you are using a separate username and password for the different stores you will need to enable the option "Logout of Yahoo! when the store file is closed".  This is found on the "Preferences" tab of the "Program Settings".  This forces The SuperManager to log out of Yahoo! when you are potentially switching to a different store.  If this option is left unchecked The SuperManager will not sign you out of Yahoo! after it is finished performing functions with your store manager.

2. If you are using the same username and password for your stores you can have two or more instances of The SuperManager running at once, one with each store.  In this way you can be working with your stores simultaneously.  Just pay close attention to which store's instance of The SuperManager you are in!  You can find this in the title bar of the window.
#47
You can choose whether The SuperManager will create customers for each order export into QuickBooks.  To have The SuperManager create customers for each order follow these steps:

1. Choose "View" | "Program Settings..." from the main menu in The SuperManager.
2. Go to the "XML Excahnge Formats" tab.
3. Select "QuickBooks" from the list and check "Create customers for order exports".
4. Click "Ok" to close the program settings.

Now customers will be created with the address, phone and email fields from your SuperManager order.
#48
The SuperManager can automatically retrieve Yahoo! orders for Yahoo! Legacy, Merchant Standard and Merchant Professional stores using the Orders->Export->XML feature.?  However, it is not possible to retrieve orders through a Merchant Starter store becuase the Orders->Export->XML feature is not available. Alternatively, Merchant Start store owners can use the XML email notification feature from Yahoo! to retrieve Yahoo! orders by XML and import them into the SuperManager.

Follow the steps below to setup and use the Yahoo! email XML notificaiton feature to import orders into the SuperManager and take advantage of all the SuperManager features:

1. Browse to your Yahoo! store manager and click the "Order Emails" link under the "Order Settings" heading.
2. Enter the email address(es) where you would like the XML orders sent.
3. Select the option which specifies how frequently the orders should be sent (each option will work with the SuperManager).
4. Specify the format as "XML Format"
5. Next, click "Done" and then click "Publish Order Settings" on the Store Manager page and then "Publish" to publish the new email notification settings.

Follow the steps below to import the XML orders into the SuperManager:

1. Once a Yahoo! XML order email has been received in your email inbox, save the attached XML to your computer.
2. Open the SuperManager and click "File->Import->Yahoo Orders XML" and select the file that you saved to your computer.
3. The new orders will be imported into the SuperManager.
4. Click "File-Save" to save your SuperManager store database.

Please email customer support at info@thesupermanager.com if you have questions about this FAQ or any other issues.

Thanks!
SuperManager Customer Support Team
#49
This error can be caused by internect connection issues.?  Most often we find this issue to be caused by firewall software blocking The SuperManager from gaining access to the internet. ? To correct this error open you firewall software and grant access to The SuperManager to access the internet.

Here are specific instructions for some common firewall programs:

ZoneAlarm
Open the ZoneAlarm Control Center by right clicking on the "ZA" icon in the system tray at the bottom right hand of your screen. ? You may need to click the arrow pointing to the left at the edge of the system tray to unhide the icon. ? You can also access the Control Center by going to the windows "Start" menu under "(All) Programs" | "Zone Labs" | "Zone Labs Security". ? In the Control Center select the "Program Control" vertical tab on the left. ? Then select "Programs" from the horizontal tab on the top. ? The SuperManager should be included on the list already and you will just need to click in each of the 4 boxes to change them to green checkmarks. ? If it is not on the list you can click the "Add" button from the bottom of the dialog and select the file "C:\Program Files\SuperManager\SuperManager.exe" to first add it to the list. ? Then check each of the four boxes.


McAfee Personal Security
Open the McAfee Personal SecurityCenter by double click on the "M" icon in the system tray at the bottom right corner of the screen. ? You may need to click the arrow pointing to the left at the edge of the system tray to unhide the icon. ? Once you have the Security Center open click on the "Personal Firewall" link on the left side of the dialog. ? Once the firewall settings are displayed choose "View the Internet Applications List". ? Once the list is displayed choose "New Allowed Application". ? This will bring up a dialog in which you are prompted to select a file. ? Select the file "C:\Program Files\SuperManager\SuperManager.exe". ? This should add The SuperManager to the list. ? Once The SuperManager is on the list of approved applications you can close the SecurityCenter and The SuperManager should function properly.


Norton Internet Security
Open the Norton Internet Security Settings by right clicking on the yellow globe-shaped icon in the system tray at the bottom right corner of the screen and choosing "Open Norton Internet Secutiry".?  Once you have the Security Settings are open click on the "Personal Firewall" link in the center of the dialog.?  Click on the "Configure" button that coes up on the right side of the dialog.?  Once the firewall settings are displayed choose the "Programs" tab.?  Once the list is displayed look for "The SuperManager" on the list below the "Manual Program Control" heading.?  If it is not there choose "Add".?  When you are prompted to select a file select the file "C:\Program Files\SuperManager\SuperManager.exe".?  This should add The SuperManager to the list.?  In the "Internet Access" column set the permissions to "Permit All".?  ? You can then close the settings and The SuperManager should work properly.


Sygate Personal Firewall
The first time you use The SuperManager to access the internet the following popup will be displayed.


Check the box on the left and specify not to ask again for this application and choose "Yes".?  If you ever want to check the status, version or permissions for The SuperManager and other applications you can open the Sygate control panel and choose "Applications".


Note: With this firewall whenever you upgrade The SuperManager you will have to reboot to allow Sygate Personal Firewall to recognize the new version.


Kaspersky
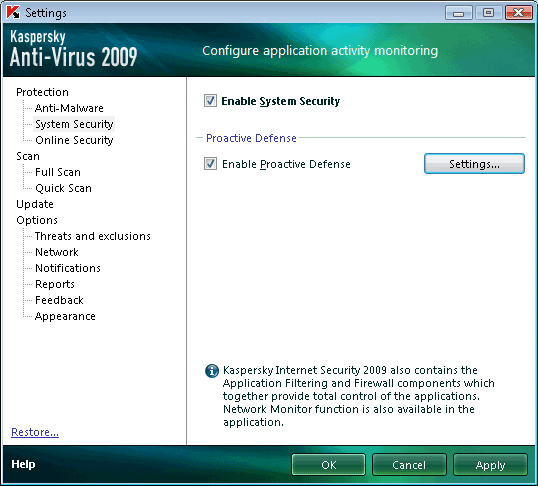
Open the Kaspersky control panel and select "System Security" and press "Settings...".  Press the "Settings..." button next to "Enable proactive defense".  Uncheck "Operating system kernel modification" and "Hidden objects detection".


#50
FAQ / Why Do I Recieve Tracking Update XML Emails?
August 04, 2005, 01:01:58 PM
There is a feature in the email settings called "Bcc all emails to myself".   This causes The SuperManager to send a copy of EVERY email it sends to the email address entered in your company profile.  This includes the emails that are sent to update order tracking information to Yahoo!'s server.  You can stop recieving these emails you can uncheck this box.  To recieve copies of other emails, while not recieving these you can add your email address or "company_email" to the Bcc box of the email templates of which you wish to recieve copies.
#51
The process is pretty straight foward.  Just follow these simple steps:


  • Install The SuperManager on the new PC.  If you need to download the installer you can do so by going to www.thesupermanager.com, clicking on "Download" and entering your license key in the box.  If you don't know your license key go to "Help", "About The SuperManager..." in SuperManager (on the old computer).  You can also find your license key in the email we sent you when you purchased your license of SuperManager.
  • Copy your .smg file from your old PC.  If you don't know the path just go to "File", "Save As..." in SuperManager on the old computer and save the file to a location that is easy to find, such as on your desktop.  Then transfer this file to your new computer.  You should probably store it in your "My Documents" folder somewhere.
  • Open SuperManager for the first time on the new computer.  When you open The SuperManager for the first time on the new PC you will be asked for your license key.  This key was provided to you when you purchased The SuperManager and is valid on as many machines as you need to install it on for YOUR OWN business needs.
  • After SuperManager opens, use "File"|"Open" to open the .smg file that you copied over.  The SuperManager will remember the file you last had opened the next time you load it so you should just have to do this once.
  • Copy your settings file
    When Using SuperManager 1.5 or Newer
    In SuperManager go to "View", "Program Settings" and press "Save As..." in the bottom right corner.  Then save this settings file on your desktop or another each location to find.  Transfer this file to your new computer in a place that is easy to find.  Then in SuperManager on the new computer go to "View", "Program Settings" and press the "Load" button and select the file you copied from the old computer.

    When Using an Older Version of SuperManager
    Navigate in the file windows file explorer to "C:\Program Files\SuperManager\" and copy the file "SuperManager.set" to your new computer in the same location.  When The SuperManager is installed a default settings file is created.  You will need to overwrite this default file on the new PC with your settings file from your old PC.  Note that in order for this file to properly overwrite the default settings you will need to have SuperManager closed when you overwrite the settings file.

If you are transferring to a computer with Windows 7 or higher, you may also need to follow the steps in this post to be able to print properly:
http://www.thesupermanager.com/forum/index.php/topic,362.0.html
#52
The appendix of the User's Manual gives a complete list of all the available keywords and their meanings.
#53
Here are a couple of things to check if your shipment information is not correctly updating on your Yahoo Store:


Make sure shipment tracking features are enabled for your Yahoo! store
You have to enable this feature in Yahoo! before it will start processing shipment statuses.  To check this, go to your Yahoo! store manager and press the "Shipment Status" link.  Check the first setting to make sure "Use Shipment Tracking features" is checked.


Make Sure Update Order Status is Enabled in the Store Settings
You can turn off shipment status updates for each individual store to be able to handle situations where some stores in your file should be updated and others not

Follow these steps to make sure this setting is enabled for your store(s):
1. Go to "View", "Store Settings..."
2. On the "Stores" tab, select the store you are working with
3. Make sure that "Update order status" is checked
4. Repeat steps 2 - 3 for each store as necessary


If the shipment information is still not updated, please contact info@thesupermanager.com for help.
#54
Some ISPs block Simple Mail Transfer Protocol (SMTP) to all mail servers except their own.  If this is the case with your ISP you will need to obtain the name of this server and any authentication or port settings that they might require.  Typical names for smtp servers are:

mail.my_isp_name.com or
smtp.my_isp_name.com

Once you have these settings enter them in the "Email Settings" tab of the Store Settings.  Changing the server emails are sent through will have no impact on how they appear to the person recieving the mail.

If you continue to have problems sending emails contact SuperWare support at info@thesupermanager.com