Menu

Show posts

This section allows you to view all posts made by this member. Note that you can only see posts made in areas you currently have access to.

Show posts Menu

Topics - David Johns

#21
You can use SuperManager's flexible data export functions to export a list of email adresses for your customers.  First, you will need to create an export format including the email address.  To do this:

  • Go to "View", "Program Settings" and select the "Export Formats" tab
  • Click "Add" and enter "Customer Emails" for the name of the export
  • Check the "File Header" option and enter the following in the box:
Customer Name,Customer Email

  • In the box at the bottom enter:
bill_name,order_email

  • Press "Ok" to save and close the program settings

To export the information, just go to "View", "Orders".  Use the "All" tab of the order list if you want to export all orders or use the "SuperFilter" to get the orders you want to export on the order list.  If you use the SuperFilter, a good practice is that the last filter you run is "Unique Emails".  After doing any other filters you want to apply, select this filter, click "Go" and choose "From Current List".  This will make sure you only get one entry for each email address in your export.

Once you have the orders you want on the order list, press ctrl-A to select all the orders, then right click and choose "Export", "Customer Emails" and choose where to save the file.  You can then open this file in Microsoft Excel or equivalent.
#22
SuperManager uses the Windows Installer to install the files and programs it needs to work.  In rare instances, Windows Installer fails to uninstall and you will not be able to uninstall or upgrade SuperManager.  To fix this, follow these steps:

Warning: Serious problems might occur if you modify the registry incorrectly by using Registry Editor or by using another method. These problems might require that you reinstall the operating system. Modify the registry at your own risk.


  • Press the start button and with windows 7 enter "regedit" in the box that says "Search programs or files" and hit enter.  In windows XP, enter press the "Run..." button and then enter "regedit" in the box and hit enter.
  • Once in the registry editor navigate to "HKEY_CURRENT_USER\Software\Microsoft\Installer\Products" and make sure that this key is selected in the tree of keys on the left of the Registry Editor
  • Go to "Edit", "Find" in the registry editor's main menu and search for "SuperManager".  This should take you to a subkey underneath "HKEY_CURRENT_USER\Software\Microsoft\Installer\Products" that contains Windows Installer's information about SuperManager.  It will have data values such as "AdvertiseFlags", "", "AuthorizedLUAApp" and other values  to it.
  • If the search does not find such an entry, you will need to obtain help from SuperManager Support.  If the search finds an entry such as this, select the key containing these values from the tree on the left and press "Del" to delete it and choose "Yes" when prompted for confirmation.


    You should now be able to install SuperManager using the installer.
#23
When you switch merchant accounts in the Yahoo gateway there is just one small setting that needs to be adjusted in SuperManager to make sure it uses the new merchant account when performing manual transactions.

  • Go to "View", "Store Settings"
  • On the "Stores" tab, select the store for which you want to adjust the account to use
  • Look for the new account in the dropdown box "Make manual transactions through"
  • If you do not find the account listed in that dropdown, close the store settings and go to "View", "Admin" and press the "Get Batches" button.  After SuperManager has gotten the batches go back and try to select the account again.  It should be on the list now.
  • You will have to select each store that should use that account on the list of stores and adjust the setting, since it can be different for each store.
#24
FAQ / How do I handle returns in SuperManager?
January 29, 2012, 06:17:59 AM
SuperManager has several features that all you to handle returns.  Returns can be handled in one of two ways:

  • By adding returns to the order
  • By manually setting the items that have been returned to returned or defective status

Either approach will result in the balance due from the customer reflecting the amount due, however, adding a return to the order offers the following additional benefits:

  • It allows you to create an RMA number to give the customer
  • It allows you to record the date the customer informed you they would be returning the item and the date you received the item
  • It allows you to group a number of items from the order that were returned at the same time
  • It allows you to automatically add a restocking fee to the order
  • It allows you to record a reason the item(s) were returned
  • It allows you to add the return to a shipment so that you can create a return shipping label to send to the customer if you need to
  • You can send an email template to your customer containing information about the return, including a list of items received
  • Returns can be exported to QuickBooks as credit memos

If you don't need any of these features, you can just mark the items as returned or defective and if necessary add new items to replace them.

Based on which method is best for you, you can follow these step-by-step instructions:

Entering a Return

  • Double click on the order on the order list for which you want to add the return.
  • On the right side of the order details screen you will find two tabs saying "Ship" and "Return", select the "Return" tab
  • Press the "Add Return" button, which will add a new return to the order and bring up the return details screen
  • The number field will contain the order ID and a numerical sequence for the number of return in the order.  If you want to you can press the "Generate" button and SuperManager will create a random sequence of 4 alphabetic characters for you to use as an RMA number - or you can append any suffix to the return number instead if you so desire.
  • Enter the date you were informed about the return and if applicable, check the small checkmark in the date received field and enter the date you received the return
  • All the items in the order will be listed on the item list, however, at first none of them will be  to this return.  Select the first item that should be included in the return and then set the quantity returned.  You can also check the "Restocking fee" for this item and change the "Reason returned" if applicable.  The reason returned field is primarily used to differentiate between defective items and items that should be returned to stock, but can be used for your own records as well.
  • You can add this return to a shipment if you want to either create a shipping label to send to the customer or you want to have a place to enter a tracking number given to you by your customer.  To do so, check to "Shipment" button and select a shipment or press "New" to add a new shipment to the order and add the return to it.
  • Press "Ok" to save and close the return details.  You will see that a return object now appears on the list of returns with the item codes included in the return attached to it.  You will also see that the items in the return have been marked appropriately as defective or returned on the item list.  Note that you can always modify the return by double clicking on it on the return list.

Manually Setting Items as Returned

  • Right click on the item to be returned and choose "Status" and then "Returned" or "Defective", depending on whether you want the item to be returned to stock or not
  • This will set the entire quantity of that item to returned or defective.  If you need to adjust this so that only a portion of the items were returned or defective, you can double click on the item and on the item details, next to the "Status" you can enter a quantity.  You can also record a return date in this location.
  • If you set up an email template to send information about the return to your customer, you can press the email button and select that template.  Here is an example of such a template that you could add to your store settings:
bill_first_name,
We have processed your company_name return.  We understand that you want to return the following items.  Please let us know if this list is inaccurate.  Your RMA number is return_id.

item_return_quantity of item_quantity item_description item_options

Please contact us if there are any problems or questions.
company_name


    Note that when you send this email it will only contain the items that you have specified are in this return.

Sending Replacement Items
Regardless of the approach chosen above to log the return, you can send replacement items to your customer using the following steps:

  • Press the "Add Item" button and add a new item to the order.
  • When on the item details screen for the item you are adding you can press the "New" button next to the shipment list.  This will add a new shipment to the order and select it as the shipment for the item.
  • When you are finished adding the new item, you can press the "Add" button next the the "Previous" button if you want to go directly to adding another item to the order.  When you are done adding all the items to the order you can press the "Ok" button to save and close the item settings.
  • Once you have closed the item settings and are back on the order details screen, you can select the new shipment on the list of shipments in the order and then press the print button and choose "Default Packing Slip" or choose any specific report of type "Packing Slip".  When you print a packing slip from this screen it will only contain the items that are in the shipment that you have selected from the shipment list.
  • Note that you can also double click on the shipment and press the email button.  When you send an email from this page, if there is an item list in the email template, it will only include the items in this particular shipment
#25
Having problems with the SuperManager auto download of orders?
Here's a quick workaround to get orders downloaded so that you can continue working until the problem is solved...

1. Log into your Yahoo! Store Manager and click the "Orders" link under the "Process" section.

2. Locate the "Export" button on the Yahoo! Order Manager page and then enter the range of orders that you would like to download and import.  If you do not have an "Export" button, then see this post about how to import orders from a Merchant Starter store: http://www.thesupermanager.com/forum/index.php/topic,45.0.html

3. Change the "Format" Dropdown from the default "MS Excel" to "XML"

4. Next, click the "Export" button and then click "File->Save As" and save the "Orderlist.xml" file to a friendly location on your computer (desktop, my documents, etc.)

5. In the SuperManager, click "File->Import->Orders->Orders XML" and then browse and select the "Orderlist.xml" file that you saved in step 4.

6.  Your new orders should be imported in the Supermanager and you can print invoices and continue processing as normal.
#26
Just a few settings have to be entered into your store settings for SuperManager to interact with Amazon via its new MWS API.  First of all, this integration is only available in version 1.5.0.0 and newer.  If you do not have this version, use the "Help" | "Check for Updates" feature to download and install the latest version.

Instructions for setting up the connection with Amazon are now included in section 6.1 of the User's Manual.

Note that because of Amazon's "throttling" limits, downloading a large set of orders may take some time.  If you experience problems with Amazon's server timing out while downloading a large range of orders you may need to break up the order downloads into ranges of approximately 500-1000 orders.

Note: Amazon's API will not export the full information for orders that have been received, but not yet processed by Amazon.  Such orders will appear with an order ID, but no customer information and $0 prices for all items.  When you receive such orders you will have to update the orders until the information is populated and the order is ready to ship.  To do this, right click on the order in the order list and choose "Update from Store Manager".
#27
It is possible to export a batch of tracking numbers from Dazzle and import them into The SuperManager.  To do so, follow these steps:

1. In Dazzle, switch to the "Postage Log" tab:


2. From the main menu, choose "File" | "Export..."
3. Choose the start and end date you want to export and click "Export"
4. Change "Save as type" to "Text, XML format" and save the file to your desktop or someplace easy to find it.
5. In SuperManager, choose "File" | "Import" | "Dazzle/Endicia XML" and select the file you just saved
#28
FAQ / How do I make a range report?
May 02, 2011, 04:13:00 AM
The attached html file is a sample range report.  Range reports are intended to show one line for each order or one line for each order item if item variables are used.  If you want a total of a column of numbers you can put a second set of the same order variables at the bottom.
#29
FAQ / How do I charge orders through Authorize.net?
April 29, 2011, 04:35:09 PM
Enabling API Access on your Authorize.net Account
First you will need enable access to the API for your Authorize.net account.  This is done by following these steps:

  • Login to your Authorize.net account and choose "Account" from the main menu bar.
  • Click "API Login ID and Transaction Key" under the heading "Security Settings".

Adding your Authorize.net Account to SuperManager
Next you will need to add your Authorize.net account to your SuperManager file.  This is done by following these steps:

  • Choose "View" | "Admin" from the main SuperManager menu bar to switch to the admin view.
  • Right click in the empty area of the batch list and choose "Add Account" from the popup menu.
    Note: if you have a lot of accounts/batches already defined in your database, you may need to scroll all the way to the bottom to find some empty space
  • Enter a name for the account, set the type to "Authorize.net" and enter the login and password for the Authorize.net API.
    Note: This is not the username and password that you use to login to the Authorize.net back end.  In the back end, you'll need to enable API access and retrieve your login id and transaction key

Choosing Authorize.net As the Account to Use to Charge Orders
After setting up your account you will need to specify it as the account of choice for making transactions.  This is done by following these steps:

  • Choose "View" | "Store Settings..."
  • From the list of stores, choose the one for which you want to use the Authorize.net account
  • From the dropdown menu below "Make manual transactions through:" choose the name you just  to the Authorize.net account.

After modifying these settings, any new manual transactions will be performed through your authorize.net account.

Note: Also note that you can now download settlement batches from Authorize.net automatically by clicking on the "Get Batches" button on the Admin screen
#30
Reports of total sales over a period can be created using The SuperManager's "SuperFilter" feature.  For example, to create a report of all sales over the previous year:


  • Go to "View" | "Store Settings..." and select the "Reports" tab
  • Make sure there is a "Financial Summary" report on the list.  If not, save the file "Financial Summary.html" attached to this post to your computer and click "Add" to create a new entry on the report list and then click "Browse" and select this file from where you saved it.  Set the report type to "Summary".  You may want to choose "Exclude canceled/fraud orders".
  • Click "Ok" to save and close the store settings
  • Choose "View" | "Orders" if you are not in the orders view and select the "SuperFilter" tab
  • Choose "Date" as the filter and select the first day of last year as the "From" and the last day of last year as the "To" field and click "Go" to display these orders on the order list.
  • Press ctrl-A to select all orders on the list, right click on the order list and choose "Print Report" | "Financial Summary".

Additional Tips:

  • You can select a different filter, such as "Ship To State" from the "Filter" dropdown, enter the abbreviation for the state you want and click "Go" and then "From current" to filter the current results (last year's orders in the example above) by this added filter.
  • You can save this report to an html file on your computer to be able to open the report in a webbrowser to copy and paste data from the report to another application.  To do this, choose "Export..." | "Report" and then the report name instead of "Print Report" as described above.
#31
You can use The SuperManager to submit a data feed to Google product search using the Google Merchant Center using the following steps:


  • Save the file "Froogle.smx" attached to this post to your desktop.
  • In SuperManager, go to "View" | "Program Settings..." and click the "Import..." button on the "Preferences" tab under the "Import/Export Formats" heading.
  • Click "OK" to save and close the program settings
  • Choose "View" | "Products" to switch to the products view
  • Select the products that you want to export, right click and choose "Export" | "Froogle Product Feed" and save the file to a place easy to get to on your computer
  • If you have not already done so, sign up for an account on the Google Merchant Center
  • Log in to your Merchant center dashboard
  • Select "Data Feeds" and click the "New Data Feed" button
  • Select the target country, choose "googlebase" as the Format and enter a data feed filename (the filename can be any arbitrary name) and press the "Save Changes" button
  • Once your new data feed has been added, click the "Manual upload" link  with the feed
  • Select the file you just saved from The SuperManager and click the "Upload and process this file" button

Google takes a while to process the added products, but after that is finished, you should see the products from your data feed show up on the "Products" tab in your Google merchant center.
#32
SuperManager supports calculating profits using two methods:

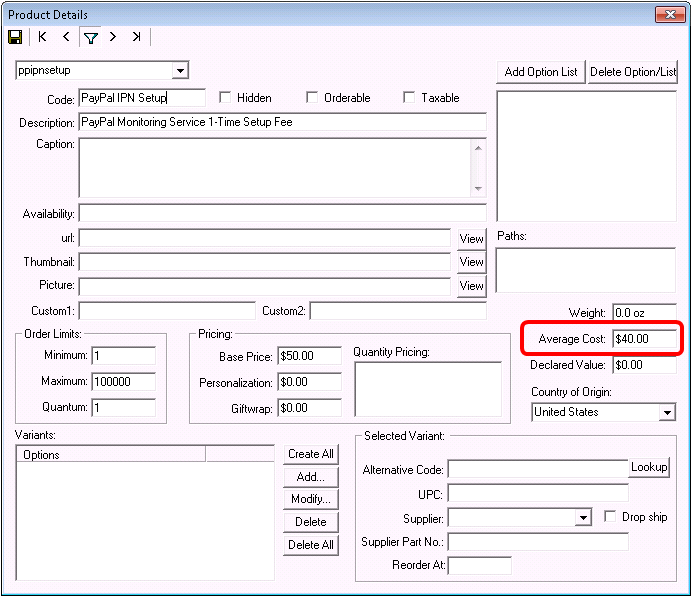
1. Average costing ? this is done when you have inventory tracking turned off.  If you have the ?average cost? populated for each product, as described in our exchanges below, SuperManager will calculate cost charged ? average product cost for each item.


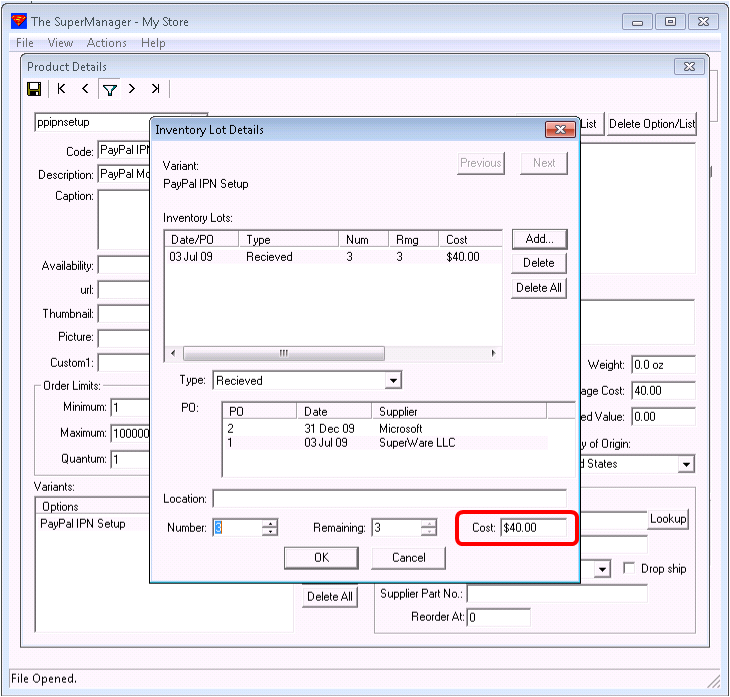
2. FIFO (First in, first out) costing ? this is done when you have inventory tracking turned on.  You can  a cost of goods sold to each batch of items that you purchase from your suppliers for each lot of inventory you receive.  SuperManager then uses the old lot of inventory until it is expended and then moves forward to newer lots.  In this manner it will keep track of exactly how much you paid for a particular item and how much you sold it for.


In both cases, SuperManager copies the cost of the item into the order itself so that it has an independent record of the product cost.  Once the order?s version of the product cost of each item is established it will not be re-calculated from the average or inventory lot cost.  This value can be observed and changed on the item details screen.


In addition to product cost vs. sales price, SuperManager considers the amount received for shipping vs. the postage amount for each shipment.  In order for this to be accurate the postage costs have to be populated properly in each shipment in the order.  This amount can be edited on the shipment details screen.


Once all this information is correct, the order profit shown on the order details screen will be correct.
#33
SuperManager uses HTML report templates so they are easy to customize and make new ones.  To add a report template to your store file following these steps:

1. Generate the template.  You can create templates by using one of the default templates as a starting point.  There are just a couple of limitations to keep in mind:

  • Templates use field variables to show where information from your orders belong.  You can find the list of variables in appendix A of the user's manual
  • Variables starting with "item_", "shipment_", "total_" and "payment_" are expected to be in a table row.  When SuperManager finds these variables, it finds the preceding <TR> element and the </TR> element after the variable and makes a copy of that HTML row for each of the items, shipments, totals or payment events in the order.
  • For the preceding functionality to work correctly, the <TR> element may not have any attributes
  • SuperManager uses the style "pagebreak" to insert a pagebreak.  If this style does not appear your report will be generated without page breaks between the orders exported.

2. Go to "View" | "Store Settings..." and select the "Reports" tab.  Note that this is not available in The SuperManager Lite Special Edition for Quickbooks? Users.


3. Click the "Add" button and give the report a name.  You can choose anything for this name, but it is recommended not to use the same name twice.

4. With the new report selected on the list, press the "Browse..." button and select the new report template html file.  Note that the default templates are copied to "C:\Program Files\SuperManager\" when The SuperManager is installed.  It is not necessary to store all your store templates here, but this might be a good place to keep all of them.

5. Select the type of report you have made.  The following types are available:

  • Invoice - For orders that are intended to have one page per order
  • Summary - For orders that are intended to show agregate totals of the orders you have selected (for example, a financial summary showing the total income for a set of orders)
  • Range - For orders that are intended to have a common set of order information and one body of item information for the selected orders (for example, for a picklist where you want one entry per item per order)
  • Packing Slip - Similar to invoices, but only shows the items in a single shipment in the order
  • Purchase Order

6. Set any other options:

  • Set as default - There may be one default report of each type.  Default reports can be generated using the default menu option at the top of the report list.
  • Autoprint for new orders - When checked, this report will be printed for each new order downloaded. (not if SuperManager overwrites an existing order)
  • Exclude canceled/fraud orders - When printed any canceled or fraud orders will not be printed

7. Press "OK" to save and close the store settings.

After adding the template, to print it go to "View" | "Orders", select the orders for which you want to print the report, right click and choose "Print Report" and then the name of the report template you added.
#34
QuickBooks / QuickBooks 2009 R9
December 07, 2009, 05:41:49 PM
QuickBooks 2009 R9 was released the first week of December 2009.  A few issues have been observed with it that Intuit is aware of and working on.  For now we recommend that users turn off auto updates and wait until these issues are resolved.  One of these issues affects the sales tax liability report.  You can read about this here:
http://support.quickbooks.intuit.com/support/pages/knowledgebasearticle/898630

Thanks,
David Johns
#35
FAQ / How Do I Create a QuickBooks Deposit
April 29, 2009, 05:10:43 PM
After exporting orders using SuperManager into QuickBooks the funds collected from these orders will generally be in your undeposited funds account.  To get them into one of your QuickBooks bank accounts you will need to create a "Deposit" transaction in QuickBooks.  To do this:

  • Choose "Banking" | "Make Deposits" from the main QuickBooks menu.
  • If a window titled "Payments to Deposit" does not come up press the "Payments" button
  • Select the payments that should be deposited from the list of payments by putting a check to the left of each one to include.

  • After choosing all the payments to deposit press "OK"
  • Make sure to check the account the deposit is set to "Deposit To" and change it if necessary.
  • If you need to subtract from the total of the orders an amount for fees or commisions select the first blank line after the list of orders in the deposit, enter the name of the Vender to which it was paid (you may need to add the vender first it they are not already on your vender list), enter the account to which the fees are billed and enter the amount.

  • Click "Save and Close" or "Save and New" to complete the deposit.
#36
This occurs infrequently because Dazzle's xml files are not always 'Well formed' i.e. they don't always follow the rules for exporting an xml format file.  To fix it you can do the following:

1. Right click on the file and choose "Open With..."
2. Select ?Notepad? if it is on the list or pick "Choose Program.." And select it from the list if it is not.
3. Once in notepad choose "Save As..."
4. Enter a filename and for "Encoding" select "UTF-8"
5. Try importing the file again
#37
Margins for reports you print in SuperManager are governed by the settings you have in your Internet Explorer page setup.  To adjust them:


  • Close SuperManager and open Internet Explorer
  • Choose "File" | "Page Setup..." or for newer versions of Internet Explorer press the gear button on the top right corner next to the address bar and choose "Print" | "Page Setup..."
  • Adjust the Margins in the bottom right corner and press "OK"
  • Re-open SuperManager
#38
We ship ? our packages Priority Mail and ? First Class. I have layouts made for both, but currently use a 2-step process for mailing. Endicia tells me I can specify which layout to use for each mail class. Do you have an article or a page reference in the manual on how to configure?
#39
FAQ / Why don't background colors print on my reports
October 17, 2007, 07:19:43 PM
SuperManager uses Internet Explorer to print reports.  IE has a feature that by default disables the printing of background colors.  To enable printing of shading and other background features follow these steps:

1. Close SuperManager.
2. Open Internet Explorer and choose "Tools" | "Internet Options"
3. Select the "Advanced" tab and look for the option "Print Background Colors and Images" and enable it as shown below.

#40
The QuickBooks Vendor List can be imported into SuperManager using the following steps.  These steps were generated for QuickBooks Premeir 2007, although they are probably similar for other versions.

1. In QuickBooks go to the "Vendor Center" either using a toolbar button or "Vendors" | "Vendor Center" from the menu.
2. Click on the "Excel" dropdown and choose "Export Vendor List..."
3. Choose "comma separated values" as the format and click "Export"
4. Download the following file: http://www.thesupermanager.com/download/smx/quickbooks_vendors.smx
5. In SuperManager go to "View" | "Program Settings" and click "Import SMX..." and choose the file you just downloaded.
6. Press the "Save Settings Now..." button and close the program settings.
7. Choose "File" | "Import" | "QuickBooks Vendor List" and select the file you exported from QuickBooks.

The addresses may need to be re-evaluated after you import the vendors as QuickBooks and SuperManager save addresses a bit differently.  To get this to occur you will need to press the "Address" button while viewing each address.  This will cause SuperManager to separate each address out into Address1, Address2, City, State and Zip.